The Power of Puppet
Quest objectives
- Use a Puppet module to set up a Graphite monitoring server on the Learning VM.
- Use the Puppet Enterprise console's node classifier to efficiently manage the Learning VM's configuration.
Get started
We covered introductions in the last quest. Now it's time to dive in and see what Puppet can actually do.
In this quest you will use the Puppet Enterprise (PE) console to set up Graphite, an open-source graphing tool that lets you easily visualize the state of your infrastructure. Graphite, like Puppet, spans the gap between nuts-and-bolts and the big-picture, which makes it a good example to get you started on your path to Puppet mastery.
One more note: as you go through this quest, remember that Puppet is a powerful and complex tool. We will explain concepts as needed to complete and understand each task in this quest, but sometimes we'll hold off on a fuller explanation until a later quest. Don't worry if you don't feel like you're getting the whole story right away; keep at it and we'll get there when the time is right!
Ready to get started? Type the following command:
quest begin power_of_puppet
Forge ahead
Graphite is built from several components, including the Graphite Django webapp frontend, a storage application called Carbon, and Whisper, a lightweight database system. Each of these components has its own set of dependencies and requires its own installation, and configuration. You could probably get it up and running yourself if you set aside a little time to read through the documentation, but wouldn't it be nice if somebody had already done the work for you?
You're in luck! Puppet Labs operates a service called the Puppet Forge, which serves as a repository for Puppet modules. A module nicely packages all the code and data Puppet needs to manage a given aspect in your infrastructure, which is especially helpful when you're dealing with a complex application like Graphite.
Task 1:
The puppet module tool lets you search for modules directly from the command line.
See what you can find for Graphite. (If you're offline and run into an error, look for
instructions below on installing a locally cached copy of the module.)
puppet module search graphite
Cool, it looks like there are several matches for Graphite. For this quest, use
Daniel Werdermann's module: dwerder-graphite.
It's also a good time to take a look at the Puppet Forge
website. While the puppet module search tool can be good to quickly locate a module, the
Forge website makes it much easier to search, read documentation, and find a module's source
code. Note that among the available modules, the Forge includes two categories of pre-reviewed modules.
Puppet Approved modules adhere to a set of Puppet Labs specifications for style, documentation, and
semantic versioning, along with other best practices standards. Puppet Supported modules are
rigorously tested for compatibility with Puppet Enterprise and are fully supported by Puppet Labs.
Task 2:
Now that you know what module you want, you'll need to install it to the Puppet
master to make it available for your infrastructure. The puppet module tool makes
this installation easy. Note that we're going to specify the version to ensure that
it remains compatible with the instructions in this guide. Go ahead and run:
puppet module install dwerder-graphite -v 5.16.1
If you don't have internet access, run the following terminal commands to use cached versions of all the modules required for quests in this guide:
mv /usr/src/forge/* /etc/puppetlabs/code/environments/production/modules
This installs the modules for all of the quests in this guide. You can skip future instructions for installing modules.
Easy enough, but what did we do, exactly?
When you ran the puppet module command, Puppet retrieved the graphite module from
Forge and placed it in the Puppet master's modulepath. The modulepath is where
Puppet will look to find Puppet classes and other files and resources made available by any
modules you download or create. For Puppet Enterprise, the default modulepath is
/etc/puppetlabs/code/environments/production/modules.
Class and classification
The graphite module includes Puppet code that defines a graphite class.
In Puppet, a class is simply a named block of Puppet code that defines a set
of associated system resources. A class might install a package, customize an
associated configuration file for that package, and start a service provided by
that package. These are related and interdependent processes, so it makes sense
to organize them into a single configurable unit: a class.
While a module can include many classes, it will generally have a main class that shares the name of the module. This main class will often handle the basic installation and configuration of the primary component the module is designed to manage.
The graphite class contains the instructions Puppet needs to set up Graphite,
but you still need to tell Puppet where and how you want it to apply the class
across your infrastructure. This process of matching classes to nodes is
called classification.
Access the PE console
We're going to explore some alternative ways to classify nodes in future quests, but for
the moment we'll opt for the simplicity of the the PE console's built-in node classifier.
Now that you have the module installed, let's go through the steps of creating
a node group, adding the Learning VM to the group, and classifying the group with the
graphite class.
But before you can access the PE console you'll need the Learning VM's IP address.
Task 3:
Of course, you could use a command like ifconfig to find this, but let's do it the Puppet
way. Puppet uses a tool called facter to collect facts about a system and make them
available at catalog compilation. This is how it knows, for example, whether it's on
Ubuntu and needs to use apt-get or CentOS and needs yum. You'll learn more about
facts and conditionals in Puppet later. For now, we can use facter in the command-line
to determine the Learning VM's IP address.
facter ipaddress
Open a web browser on your host machine and go to https://<IPADDRESS>, where
<IPADDRESS> is the Learning VM's IP address. (Be sure to include the s in
https!)
The PE console certificate is self-signed, so your browser may give you a security notice. Go ahead and bypass this notice to continue to the console.
When prompted, use the following credentials to log in:
username: admin
password: puppetlabs
Create a node group
Now that you have access to the PE console, we'll walk you through the steps
to classify the "learning.puppetlabs.vm" node (i.e. the Learning VM)
with the graphite class.
First, create a Learning VM node group. Node groups allow you to
segment all the nodes in your infrastructure into separately configurable groups
based on the node's certname and all information collected by the facter tool.
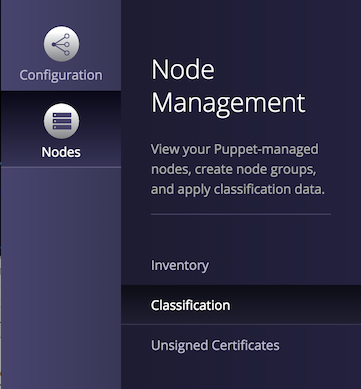
Click on Classification in the console navigation bar. It may take a moment to load.
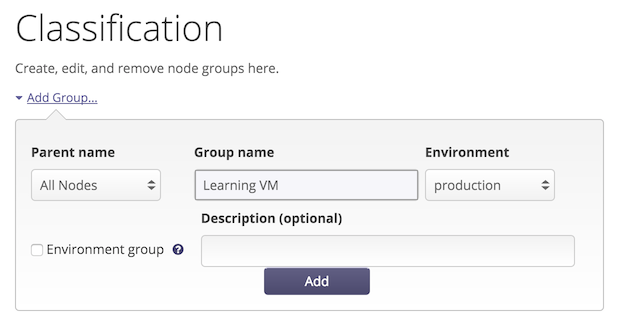
From here, enter "Learning VM" as a new node group name and click Add group to create your new node group.
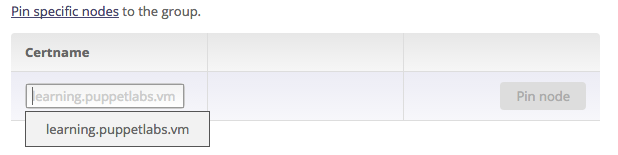
Click on the new group to set the rules for this group. You only want the learning.puppetlabs.vm in
this group, so instead of adding a rule, use the Pin node option to add the node individually.
Click on the Node name field, and you should see the Learning VM's certname autofilled. If no matching
certname appears, trigger a Puppet run (puppet agent -t) on the Learning VM. As part of the Puppet
run, the Learning VM will check in, making its information available to the console node classifier.
Click Pin node, then click the Commit 1 change button in the bottom right of the console interface to commit your change.

Add a class
When you installed the dwerder-graphite module from the forge, it made the
graphite class available in the console.
Under the Classes tab in the interface for the Learning VM node group, find
the Class name text box. When you click in the classes textbox and begin
typing, the graphite class should autofill. If it does not, click the
Refresh button near the top right of the classes interface and wait a moment
before trying again. (If the class still does not appear, check the
troubleshooting
guide
for more information.)
Once you have entered graphite in the Class name text box, click the Add class button.
Before you apply the class, there are a few parameters you'll want to set.
We already have an Apache server configured to our liking on the Learning VM, so we can
tell the graphite class it doesn't need to bother setting up its own server.
There are also some compatibility issues with the latest Django version. The author of this
graphite module has made it easy to get around this problem by picking our
own compatible Django version to use. (Keep this in mind when you start writing your own modules!)
Set the parameters, as follows:
gr_web_server = nonegr_django_pkg = djangogr_django_provider = pipgr_django_ver = "1.5"
Note that the gr_django_ver parameter takes a string, not float value, so it must
be wrapped in quotes for Puppet to parse it correctly.
Double check that you have clicked the Add parameter button for all of your parameters, then click the Commit 5 changes button in the bottom right of the console window to commit your changes.
Run Puppet
Now that you have classified the learning.puppetlabs.vm node with the
graphite class, Puppet knows how the system should be configured, but it won't
make any changes until a Puppet run occurs.
By default, the Puppet agent daemon runs in the background on all nodes you manage with Puppet. Every 30 minutes, the Puppet agent daemon requests a catalog from the Puppet master. The Puppet master parses all the classes applied to that node, builds the catalog to describe how the node is supposed to be configured, and returns this catalog to the node's Puppet agent. The agent then applies any changes necessary to bring the node in line with the state described by the catalog.
Task 4:
To avoid surprises, however, we've disabled these scheduled runs on the Learning VM.
Instead, we'll be using the puppet agent tool to trigger runs manually.
As you're working through this Quest Guide, keep in mind that the Learning VM is running both
a Puppet master and a Puppet agent. This is a bit different than what you'd see in
a typical architecture, where a single Puppet master would serve a collection of
Puppet agent nodes. The Puppet master is where you keep all your Puppet code. Earlier
when you used the puppet module tool to install the graphite module, that was a
task for the Puppet master. When you want to manually trigger a Puppet run with the
puppet agent tool, that's a command you would use on an agent node, not the master.
So put on your agent hat and trigger a Puppet run:
puppet agent --test
Graphite is a complex piece of software with many dependencies, so this may take a while to run. After a brief delay, you will see text scroll by in your terminal indicating that Puppet has made all the specified changes to the Learning VM.
You can also check out the Graphite console running on port 90. (http://<IPADDRESS>:90)
We've selected a few parameters as an example. Paste the following path after the Graphite console URL to try it out:
/render/?width=586&height=308&_salt=1430506380.148&from=-30minutes&fontItalic=false&fontName=Courier&target=alias(carbon.agents.learning_puppetlabs_vm-a.cpuUsage%2C"CPU")&target=alias(secondYAxis(carbon.agents.learning_puppetlabs_vm-a.memUsage)%2C"Memory")&majorGridLineColor=C0C0C0&minorGridLineColor=C0C0C0
Note that Graphite has only been running for a few minutes, so it may not yet have much data to chart. If you wait a minute and refresh the page in your browser, you will see the graph update with new data.
Review
Great job on completing the quest! You should now have a good idea of how to
download existing modules from the Forge and use the PE console node classifier
to apply them to a node. You also learned how to use the the facter command
to retrieve system information, and the puppet agent --test command to manually
trigger a Puppet run.